Pages

Thursday, January 13, 2011

Quick Spanish Beef/Savoury Mince/Savoury Rice

Ok, so I really don't know what to call this one.  It's always been known as Quick Spanish Beef in my family, but I'm not exactly sure what is particularly Spanish about it.  I suspect it's an indication of the state of Australian 'cuisine' back in the '70's or '80's, that is to say, a pretty poor cousin to the wealth of different cuisines that are cooked and eaten pretty well in this country today.

Anyway, it's always been a standard, mid-week feast in my family and is a particular favourite on a cold winter's night on top of buttery toast.  Also great in toasties/jaffles or for a potluck dinner.

Ingredients

  • 30 grams butter
  • 1 onion
  • 1 carrot
  • 80-100 grams rice, (arborio)
  • 1 teaspoon curry powder
  • 500 grams mince
  • 400g can condensed tomato soup
  • 250 grams water, hot

Directions

1. Place the onion and carrot in the TM bowl and chop for 5 seconds on speed 5. Scrape down the sides of the bowl and add the butter and rice. Cook for 3 minutes at 100ºC on speed 1.
2. Add the mince and cook for 5 minutes at Varoma temp on speed 1.
3. Add the soup and water and cook for 20 minutes at 100ºC on speed 1 + reverse.
Check that the rice is cooked through. If not, continue cooking for 2-3 minutes or until rice is cooked. You may need to add a little more hot water if needed.
Happy days people :)

Wednesday, January 12, 2011

Yoghurt Cheese Pastry

There are some lovely pastry recipes out there, one of my favourites being Maggie Beer's Sour Cream Pastry.  This is so quick and easy to make in a food processor or of course, the Thermomix.

As you know from my last post, I made yoghurt cheese on the weekend.  This was a really successful experiment, one that I will be repeating regularly.  I had intended to use the cheese in an experimental cheese cake, but I didn't really have enough for my springform pan.  So, that idea will sit on the shelf for a couple of weeks until I make my next batch.

In my meal plan, I had already intended to make Maddy's Artichoke & Parmesan Tart from the forum.  This called for cream cheese pastry...ahhhh...light bulb moment.  How about Yoghurt Cheese Pastry...


Ingredients

  • 135 grams plain flour
  • 60 grams butter
  • 105 grams yoghurt cheese

Directions

Place flour and butter into TM bowl and process until it looks like breadcrumbs.
Add the yoghurt cheese and use interval speed until it comes together.
Place in the fridge for at least 30 minutes before rolling out.

This pastry is super silky and easy to roll out.  I do recommend that you refrigerate the pastry once in the tart tin to help with minimising shrinkage.  This pastry will shrink when baked, so to help manage that, it helps if you can leave some overhanging pastry until after it's been blind baked.  Trim the pastry when you add the filling, before placing it back in the oven to finish cooking.

These three photos show the Artichoke & Parmesan Tart before filling, after blind baking and then the finished product.  You will notice how much the pastry has shrunk even though the pastry sat in the fridge for several hours today.  Nevertheless...simply delicious, short and flaky pastry.
Happy days!

Sunday, January 9, 2011

Labneh/Yoghurt Cheese

I made my first successful batch of yoghurt this week using the Thermomix and the ThermoServer to incubate.  I only failed once, and I know that was because I didn't use the right kind of yoghurt as the starter.  Folks, it needs to be pot set, and I knew that, but when I went shopping to get an appropriate starter, they didn't have any of the type I wanted.  I picked up something else, and I think I knew it wasn't going to work, but for some reason I tried anyway.

Later in the week, after having procured the correct starter, I used Valerie's method which is detailed on Forum Thermomix.  After 12-13 hours sitting on the bench in the ThermoServer, I lifted the lid to discover...
...perfection!
 
And so easy in the Thermomix!
 
So, now with just under a litre of yoghurt in the fridge, what was I to do with it?  Firstly, I celebrated with a delicious banana smoothie.  Then, after some pondering, I decided to make yoghurt cheese aka labneh.  Officially, labneh has salt added to help draw out the moisture, but I've been really interested to make cheesecake with this that I decided to leave out the salt.  Perhaps more correctly I should call this yoghurt cheese?
 
To make yoghurt cheese, all you need to do is line a strainer/colander with a cheesecloth, or a muslin cloth (I used a previously unused muslin baby swaddling cloth doubled over in a mesh strainer.  I put the strainer over a bowl and poured the yoghurt into the muslin.  The lot then went onto the bottom shelf of the fridge.  I did this at 10.30pm last night.  I pulled it out of the fridge this morning and poured out some of the whey to use in my English Muffins (in place of the water).  Tonight at about 8.30pm I decided to check on my yoghurt cheese.  I did a final squeeze with my hands and then admired the results...
 
...smooth, creamy, silky, luscious.

So approximately 800g of homemade yoghurt made about 320g yoghurt cheese (the remainder being whey which certainly won't go to waste, ricotta will call me one day!).  This won't be enough for the cheesecake I want to make, so into a container it goes and another batch of yoghurt cheese will be made in the next couple of days.

Happy days my friends :)

Saturday, January 8, 2011

Thermomixing up some English Muffins

 While I was making my poached eggs, I really wished I had english muffins to serve them on.  I ended up using Five Seed Bread which is an acceptable substitute, but you just can't really call it Eggs Benedict without english muffins (well, in my opinion anyway).
So off I went on a journey all over the internet to find and compare various recipes.  I settled on a recipe from allrecipes.com which I adapted for the Thermomix.  I have modified this to include the excellent cooking techniques provided by Chook Woman.

Ingredients

  • 235 ml milk
  • 25 grams white sugar
  • 7 grams active dry yeast
  • 235 ml water
  • 50 grams melted butter
  • 750 grams plain flour
  • 1-2 teaspoons salt

Directions

1. Place milk in TM bowl and heat for 3 minutes at 90ºC on speed 1. Add the sugar and mix on for 5 seconds on speed 2. Pour into another bowl and allow to cool.
Place water in TM bowl and heat to 50ºC for 1 minute 30 seconds on speed 1 (it doesn't need to get to 50º). Stop mixing, sprinkle yeast over surface of water and let stand for 10 minutes.

2.  Add the milk, melted butter and 375g of the flour to the yeast mixture. Mix for 15 seconds at speed 6 - check the mixture, it should be smooth. Add the salt and the rest of the flour. Mix for 10 seconds speed 4. Set the dial to lid closed and knead for 3 minutes.  Leave in bowl until doubled in size.
3. Punch down. Roll out to about 1/2 inch thick. Cut rounds with biscuit cutter, drinking glass, or empty tuna can. Sprinkle waxed paper with cornmeal and set the rounds on this to rise. Dust tops of muffins with cornmeal also. Cover and let rise 1/2 hour.
4. Heat greased heavy based frypan. Cook muffins for about 15 minutes in total - the first 5 minutes with the lid on (helps them to rise and reduce the density of the muffin), then flipping them every few minutes until cooked through.  Using a simmer mat will allow enough heat to get a good rise but prevent the bases burning.  Allow to cool and place in plastic bags for storage. To use, split and toast. Great with orange butter, or cream cheese and jam.

Monday, January 3, 2011

Poached Eggs

Sometimes I have my most lucid moments in the middle of the night.  Last night, I had one of them.  I stayed up WAY past my bed time (with a 2yr old and a 5 month old, every night is a school night!) trawling the web looking for silicone moulds to use in the Varoma, and reading far too many blogs.  At 1.30am I decided enough was enough and I toddled off to bed.  As I was drifting off to sleep, I decided I wanted to make poached eggs in the thermomix.  I contemplated many possible ways of achieving this.  Suddenly I had a serious light bulb moment.  What if I made the little glad wrap sacks that I've used before in a pot of simmering water on the stove, but suspended them from the lid of the Varoma?  Would there be enough room?  How would I suspend them?

The intensity with which I wanted to resolve this was such that at 2am I actually got out of bed and got my Varoma out to ponder a little more.  The answer lies with kitchen twine my friends...
I wound it through the vents in the Varoma lid to create a figure 8.  This leaves PLENTY of room to hand little sacks of eggy goodness inside the Varoma.  And yes folks, I did this (above) at 2am.  I then placed the lid in the fridge to wait for morning before finding out if the cooking method would work.
So, 500g water in the bowl, Varoma temp for 9 minutes (same as for soft boiled eggs).
 Perfect!

Before cooking the eggs though, I'd attempted hollandaise.  My first attempt ever.  It failed terribly, but I did have a pre-packaged packet of the stuff in the cupboard as a back up - breakfast was saved!

Poached eggs served with leftover Christmas ham, Five Seed Bread (EDC), cherry tomatoes, hollandaise and basil...divine...

As for the method of poaching the eggs, for 2 to 4 eggs I wouldn't bother with suspending them in the Varoma lid.  Just sitting the little sacks inside the basket works just as well.  Where this method would absolutely come into it's own is if (for some mad reason) you decided to serve poached eggs to 6 people all at once (Christmas breakfast comes to mind).  I think you could successfully suspend 10-12 eggs across the length of the twine without them being pressed right up against each other and therefore steaming successfully.  Let me know if you try it!

Thursday, December 9, 2010

Thermomix - Week 2 1/2

Wow, life just happens doesn't it?  Before I knew it, it's been well over a week since my last post.  This past week has seen me continue to use my Thermomix (I'm thinking of calling her Alice...) for as many tasks as I can think up for her.  I'd forgotten how many things I'd made until I finally got around to plugging in my camera and downloading the photos.  So, a rough estimate of the things Alice got up to during the week:
  • More butter (when I see pure cream at half price in the supermarket, how can I go past it???)
  • More bread (I find I am making a loaf of bread every 3 days or so, depending on what meals we're eating)
  • Red curry paste (EDC)
  • Thai Red Curry (EDC - using above mentioned red curry paste :-) )
  • Spaghetti Bolognaise (EDC)
  • Baf's Award Winning Creamy Chicken & Veggies (forum)
  • Stewed apples
  • Stewed rhubarb
  • Custard (lots :-) )
  • Pureed apples and carrot
  • Sweet Chilli dip
  • Banana Bread (see my earlier post from today)
  • Traditional Creamy Vanilla Icecream (EDC) 
  • Frozen Mango Bars aka Weiss Bars (forum/Best Recipes)
  • Strawberry Jam (EDC)
  • Playdough (EDC - what a hit this has been this week, need a messy mat for my floor though...)
There is now more red curry paste in my fridge than I can possibly hope to use in the next couple of months.  It was absolutely unbelievably delicious though, so we will be having more of it and I'll just have to freeze the rest in appropriately sized amounts.
The mango bars (which I froze in silicon muffin trays) are delicious.  Next time though, I'll churn the creamy part so that it sets more like icecream.  As it is, it's really solid and needs to partially thaw before you can get a spoon through it!  (Hence why it's probably better to do these as bars and eat them like you would an icecream on a stick!)  I did modify the recipe slightly to use coconut milk and macadamia nuts as well in the creamy half.
One of the loaves of bread I did this week was Buttermilk Bread (from the EDC).  Given that I'd made so much butter, I had to find something to do with all the buttermilk.  I decided to try this bread, and I'm extremely glad I did.  A beautiful, soft loaf that was very popular in this house (finally...some white bread!!!).
One of the other loaves I made was using the recipe for Isi's Easy Portugese Rolls (mentioned previously in this post).   This time though, I subbed in some wholemeal flour and made a single loaf.   I was so happy with how it turned out.  It is fabulous (and even better with homemade butter and strawberry jam!).
I mentioned last week that I'd made some tortillas.  I finally have some pics to show you.  They were really, really good.  I must make some more this week.
Forgive the poor rolling skills...nah, wait a minute, I'm just being patriotic!
Bubble, bubble, boil and trouble!
Mmmm, tortilla goodness!
The other exciting thing that happened this week, was the arrival of my much anticipated Mason Ball jars from The Redback Trading Company.  This arrival has signified the start of my Christmas jam, relish, spread and paste making efforts and I think it will all look fabulous in these jars.  How cute are they?
Happy, happy days!

Cafe Banana Bread with Coconut

A couple of weeks ago, I bought myself a lovely deep loaf pan at one of my favourite shops, The General Trader.  I just love it when companies give you a recipe when you buy their product.  Often, they're quite good.  Last night, may I say, late, last night, I embarked on making Baker's Secret Cafe Banana Bread with Coconut.  I was filled with trepidation at the start of this because the last time I'd made banana bread, I took some into work and was promptly told that it was dry.  Dry, I tell you!  Well toast it and slather it in butter I say!  It didn't have the gallon of oil that you generally get in your banana bread at the local coffee shop, so yes, it's gonna be drier.
Anyway, back to now.  I was very nervous when I read the phrase "Bake at 200ºC for 50 minutes".  50 minutes????  Dry banana bread...it haunts me...
I did what I was told.  I got quite anxious when I saw the top of the loaf go such a dark brown it nearly looked black.  (On a side note, it was 10pm at this stage, so I was quite possibly not looking straight).  I left it to cool under a tea towel until this morning when I had the grand unveiling.
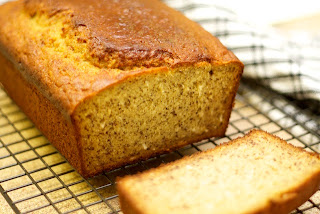
Yes, a little dark...still nervous...
But it's worth it!  Look at that crust.  Toasted, slathered in butter...bliss!  And for the record, the inside is still beautifully moist.  It certainly wouldn't require toasting, but I just love it that way...

Ingredients

  • 2 cups SR Flour, (300g)
  • ¾ cup brown sugar, firmly packed (160g)
  • ½ cup coconut, (40g)
  • 1 teaspoon bicarb soda
  • 2 bananas, mashed
  • 1 cup milk
  • 100 grams butter, melted
  • 2 eggs, gently whisked

Directions

1. Preheat oven to 200ºC. Brush deep loaf pan with melted butter to lightly grease.
2. THERMOMIX: Melt butter for 50 seconds at 60ºC on speed 4. Add the eggs, milk and banana in chunks and mix for 5 seconds on speed 7. Add the flour, sugar, coconut and bicarb and mix for 10 seconds on speed 4 + reverse. Use the spatula to make sure all the flour is incorporated from the top edges.
3. OR: Place the flour, sugar, coconut and bicarb in a large mixing bowl. Stir until well combined. Using a mixing spoon, combine the banana, milk, butter and eggs in a mixing bowl. Add the flour mixture and stir until just combined.
4. Pour the mixture into the deep loaf pan and smooth the surface for even baking. Bake in the preheated oven for 50 minutes or until a skewer inserted into the centre of the bread comes out clean. Turn onto a wire rack to cool.